
How to Make an Accurate 'Speed to Lead' Report in HubSpot
- Joe @ With Scale

- Nov 7, 2024
- 7 min read
Updated: Mar 23
When we talk about Speed to Lead—what we’re really saying is how FAST can we get VALUE to inbound leads who have taken some kind of marketing action—i.e. they downloaded content, filled in a form, requested information etc.
Lots of clients ask us to build reports to see how quickly they are getting back to leads/MQLs.
We have already discussed the importance of providing value to customer FAST and ‘Speed to Lead’ in our blog: The How-to’s of lead distribution—namely the positive effect on conversion and cutting out competitors..…but how do we measure it practically in Hubspot?
When we talk about Speed to Lead, there are 2 views we want to see:
Speed of the Sales Team—how fast can the sales team get back to their inbound leads within the hours they are working.
The Client Experience—how long are they waiting to receive the information they requested.
These are subtly different, but mainly revolve around the concept of office hours, and in what timeframe your Sales team can realistically get back to leads. This will then help form your ‘Service Level Agreements’ (SLAs) with the sales team.
Looking at Speed to Lead from the client’s point of view will enable you to put in measures for leads that come in outside of working hours—automated welcome emails, onsite pre-recorded demos, SMS etc.
There are a couple of ways to measure Speed to Lead within HubSpot itself, either their out-of-the-box solution, or using a calculator field. But we’ve not been able to use these in a practical way (for various reasons we will touch on below), and have had to build a workaround.
HubSpot’s solutions for Speed to Lead:
1st method—Lead Response Time:
HubSpot does have its own Lead Response Time—found in Reporting > Sales Analytics. This report tracks how long it takes for a Sales Rep to take an action on newly assigned contacts.
An Action in HubSpot is defined as one of the following Sales Activities:
Sending email
Calling
Using chat
Marking a task as in progress or completed
Assigning a meeting outcome
This may or may not work for you… For many teams, newly assigned contacts may not be equal to when the most recent MQL activity occurred for a customer.
The list of sales activities may also not work for your processes—a task being ticked off may not equal a lead actually being responded to, and it is also too easy to gamify (we all hope this doesn’t happen but as soon as you set Sales Level Agreements with your team (SLA’s) on ‘response time’ there’s a danger it will)
2nd method—using a calculation field in HubSpot:
You could build date-timestamp properties (as in Steps 1 & 2 of the workaround below) that reflect when an MQL action is taken on a lead and when the first contact took place.
THEN build a new property that is a calculation field in HubSpot, calculating the difference using the ‘Time Between’ function. The issue with this is that, at the time of writing, HubSpot has quite rogue rounding up and down principles.
We found that if anything was responded to within 15 minutes, Hubspot would label it “a few seconds”; if anything was over 12 hours, Hubspot would label it “one day”… It’s also difficult to distinguish between leads that came in inside/outside of office hours.
SO what do we do…
The workaround how-to:
Tools required for the workaround.
Hubspot—Sales/Marketing Pro to access workflows
Zapier
Google Sheets
The solution below is the result of a lot of trial and error, but we got there.
It doesn't matter what you name your Properties as long as you're consistent.
Step 1: CREATE 2x New Date/Time Stamp Properties
Create a new property called “Most recent MQL activity date” which is a DATE TIME picker field on the CONTACT OBJECT (there should be two Date Picker options—you want the one that’s Date + Time)
Create another date/time picker field called “First contact after most recent MQL”
Step 2: CREATE 3x Workflows that STAMP your Date/time property
1st Workflow—sets Most recent MQL activity date
The enrolment trigger is whatever represents a new MQL in Hubspot—i.e. Deal creation, Form Submission, etc.
Here we have used: The Create Date of Deals in a particular Deal Stage (which is where all the MQLs go in this particular example)
Why do we create Deals on every MQL? ... whole ton of reasons! You can read why here!

Workflow 2—sets First contact after most recent MQL
All the same enrolment triggers as Workflow 1 PLUS using Last Contacted is AFTER your “Most Recent MQL deal date” (i.e. the property you just set in Workflow 1). ‘Last Contacted’ is a Hubspot property, and unlike using Hubspot’s sales activities, this is only for logged calls, emails, etc., i.e. actual modes of communication.
N.B. This process assumes people’s emails are synced to HubSpot

Workflow 3—sets the MQL deal as an MAL
Optional step—this depends on whether you are using the concept of MALs or not, and how you categorise this.
In this case—the Workflow trigger uses ALL THE SAME triggers as Workflow 2 but it ALSO asks the question—DEAL STAGE IS ANY OF “IN COMMS” which is a deal stage that signifies that the lead was accepted by SDR as a viable marketing lead to reach out to.
Here we created a new property for this one that just updates if the most recent MQL is deemed an MAL
We’ll use this later in the reporting as a filter. We don’t want to report on MQLs that were never viable and weren’t contacted by the SDR, because that will skew the results.

Step 3: Make 2x new properties in Hubspot on the CONTACT
Time to respond to MQL in minutes
Type: Formatted number
2) Time to respond to MQL - in/outside office hours
Type: Dropdown options:
In office hours
Outside office hours
Step 4: Make a contact List with the following filters
‘Most recent MQL activity date’ (your new Contact property) is both known AND is After {{today’s date}} - i.e. from now onwards
Step 5: Make a new Google Sheet in your company drive
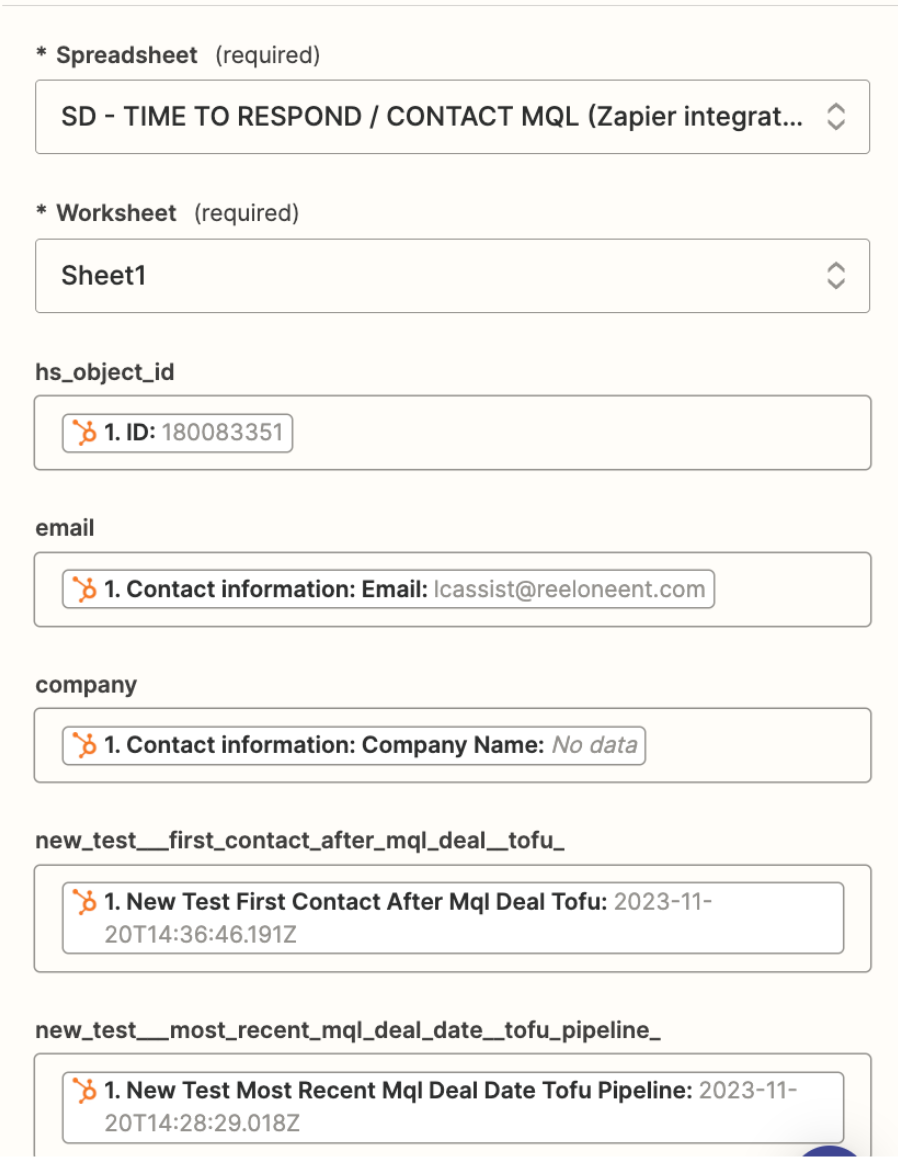
Here are the column headers you will want—they represent exactly the Hubspot properties' INTERNAL NAMES of the properties you made in the previous steps—the below names are just examples.
hs_object_id | company | new_test___first_contact_after_mql_deal__tofu_ | new_test___most_recent_mql_deal_date__tofu_pipeline_ | contact_owner___bd | sd_time_to_contact_minutes____from_zapier_ | sd_time_to_contact__mql_in_offices_hours_ |
Here we have:
Record ID of the contact
Email
Company
The First Contact Date for a new MQL (the property you created in Step 1 and set in Step 2)
The Most Recent MQL Date set (the property you created in Step 1 and set in Step 2)
The Contact Owner
The 2 new properties you created in Step 3
Why do the properties have underscores? Because we have to connect based on the Hubspot underlying code, the property’s ‘Internal Name’—which is easy to fetch.
Head to your Property you’ve made, open it up, look in the top right for this sign </> - click on this and it will give you the “Internal Name” - your Google Sheet header needs to match this exactly:

Step 6: Entering the world of Zapier
If you have used Zapier already you may be quite comfortable with this bit. If not—stay with us!
We need to make 2 ZAPS.
ZAP 1: Name = Time to contact on first MQL - EXPORT (Hubspot <> Google sheets)
ZAP 2: Name = Time to contact on first MQL - IMPORT (Hubspot <> Google sheets)
ZAP 1:
Trigger = The contact list you created in Step 4:

Set up the Zap, and add in the additional custom properties you want to retrieve =
First contact on the most recent MQL
Most recent MQL date
Hq_object_id
Email
Company - i.e your column headers that you added to your Google Sheet in Step 5

^ again—for Additional Properties—we are adding the Property name in the underlying code (Internal Name).
Then, in the next step of the Zap, you want to create a New Row in a Google Sheet, which is where you can add the Google Sheet you made in Step 5.
In this step, you can map which fields you want to send to which Column:
THESE ARE THE EXACT formulas you want to add to populate your other columns—they dynamically change to reference a column in the same row as the new row made:

Formulas:
Sd_time_to_contact_minutes____from_zapier_
=((indirect("D"&row(),1))-(indirect("E"&row(),1)))*60*24
sd_time_to_contact__mql_in_offices_hours_
=IF(AND(WEEKDAY(indirect("E"&row(),1)) >= 2, WEEKDAY(indirect("E"&row(),1)) <= 6, HOUR(indirect("E"&row(),1)) >= 9, HOUR(indirect("E"&row(),1)) < 18), "office hours", "outside office hours")
*You MAY WANT TO CHANGE the office hours, in the above formula the office hours are coded from 9am-6pm
* You will need to change “office hours” and “outside office hours” to exactly match what you have in your dropdown options for the “Office Hours Property” that you created in Step 3.
THEN SEND YOUR INFO BACK TO HUBSPOT
Use make Zap 2 (Time to contact on first MQL - IMPORT (Hubspot <> Google sheets)) as per the below:
The Trigger is every time a Row is added to your Google sheet:

Then you update the contact in Hubspot by matching on the Email, and map your column headers BACK to the Hubspot properties, including the 2 properties you made in Step 3:

Then test test test test test to check that the data is appearing in Hubspot—and let us know if you have any questions.
Step 7—the final step—you build the report in HubSpot
Still with us? 😅 Great job!
To build the report, head to:
Reports > Create Report > Custom Report Builder—and use the Contact object type
The filters you need are:

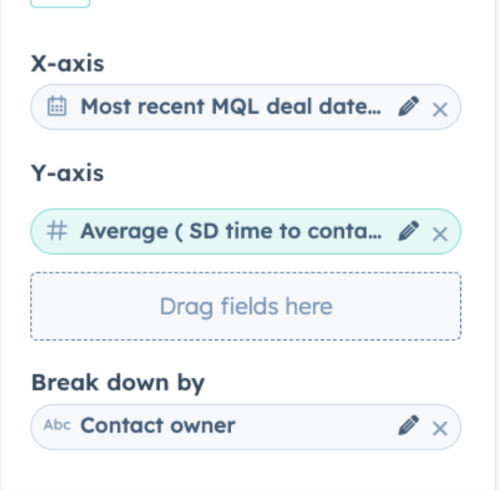
Then configure the Bar Chart as below:
Most recent MQL date = (weekly) - or whichever time frame you’d prefer
Average Time to Contact in Minutes - which is the property that is being populated by your Zapier from the Google sheet calculation
You can choose to break this down by Sales Rep also
And BINGO—you have your Speed to Lead Report! 👏🏼
As mentioned at the start, there are 2 views of Speed to Lead we want to see:
Speed of the Sales team—how fast can the sales team get back to their inbound leads? This is covered by the above report using ‘within office hours’.
Client experience—how long are they waiting to receive the information they requested? For this, we clone the above report and simply remove ‘within office hours’ to give a true picture of the number of hours it takes for a client to receive information.
If you have any questions, just let us know!
So, there you have it! How to create an accurate Speed to Lead report in HubSpot!
So what's the next?
The “SO WHAT?” Ultimately, as RevOps and Sales leaders, we want to view this information to set goals, establish Service Level Agreements (SLAs), and make improvements.
Tune in for our next blog on what those improvements can be!


Comments